Tutorial
Firely Auth is an authentication and authorization server that implements the SMART on FHIR authentication flows. It is an additional tool to Firely Server.
Several scenarios require the use of SMART on FHIR:
Protecting system-level APIs by defining which admin clients can export all resources from a Firely Server instance (e.g. using Bulk data export)
Protecting user-level APIs by enabling only authorized clients to provide practitioners information about Patients that are within their care
Protecting patient-level APIs by allowing authorized clients (e.g. a Patient portal) to provide Patients access to to their own information
Additionally, SMART on FHIR is required by national implementation guides and mandated in the following certification programs:
21st Century Cures Act, §170.315 g(10) Standardized API for patient and population services - 🇺🇸
CMS Interoperability and Prior Authorization Final Rule (CMS-0057-F) - 🇺🇸
ISiK Stufe 2 - Sicherheit
Firely Auth can be used to fulfill all of them.
There are various ways to get to know Firely Auth and the way it works together with Firely Server. As an introduction we’ll setup both to make an example Postman collection work. In the configuration section, we discuss the configuration that is possible both in Firely Auth itself and in Firely Server.
Getting started
Step 1 - Software
Firely Auth is distributed as .NET Core binaries and in a Docker image. For this introduction we will use the binaries.
Install .NET Core 8 Runtime
Download the zip file with Firely Auth binaries from the download server
Extract the zip to a location from where you are allowed to execute the program. We will call this the ‘bin-directory’
Step 2 - License
Firely Auth is licensed, like all plugins and additional tools of Firely Server. It uses the same license file as the Firely Server instance it works with.
Firely Auth requires this token to be present in the license file: http://fire.ly/server/auth.
If you don’t have this in your license file yet, you probably need to acquire Firely Auth first. Please Contact us for that. You can also test Firely Auth with an evaluation license. To acquire this license you can sign up after which you will receive an email with the license file.
By default Firely Auth will look for a license file named firely-auth-license.json, adjacent to the Firely.Auth.Core.exe
You can adjust the location of the license file in the configuration settings, see License.
Additionally you will have to place a file called Duende_License.key also adjacent to the Firely.Auth.Core.exe. This is required for production use but not testing or development. Firely will provide this key with purchase of Firely Auth. Please note that the path to this file cannot be configured. Alternatively, you can specify the value of the Duende license key with the environment variable FIRELY_AUTH_License__DuendeLicenseString or place this value in the appsettings.json file under the section FirelyAuth.License:DuendeLicenseString:
"License": {
  "LicenseFile": "firely-auth-license.json",
  "DuendeLicenseString": "<your duende license string here>"
}
Step 3 - Ssl certificate
Firely Auth will only run on https. To create a self signed certificate (for testing purposes only), you can use the tool mkcert. To enable the certificate you will have to adjust the Kestrel settings. You can use these values:
"Kestrel": {
  "Endpoints": {
    "HttpsFromPem": {
      "Url": "https://localhost:5001",
      "SslProtocols": [ "Tls12", "Tls13" ],
      "Certificate": {
        "Path": "[path to your certificate]\\localhost.pem",
        "KeyPath": "[path to your certificate]\\localhost-key.pem"
      }
    }
  }
},
Step 4 - User store
You will need to configure a user store to persist your data. This can be a SqlServer or Sqlite database. See User store to read up on how they are configured.
Step 5 - Email client
Firely Auth sends email messages to users in case their accounts should be mananged locally and not through an external identity provider. Emails will be send out for activating accounts and to execute password resets. See Email to read up on how to configure an active email server for sending the messages.
Step 6 - Clients
The concept of OAuth2 in general and SMART on FHIR in particular is that a client (an app, a website) can access data on your behalf. This means that Firely Auth must know these clients upfront. For each client several values need to be configured. For this introduction we will add Postman as a client, so you can test requests without actually building a SMART client yourself. We’ll just provide the correct settings here. The settings are documented in detail on Clients
Note
Making Postman trust the self-signed certificate of Firely Auth is outside the scope of this tutorial. For the purpose of this tutorial you can instruct Postman to not check SSL certificates.
"ClientRegistration": {
    "AllowedClients": [
        {
            "ClientId": "Jv3nZkaxN36ucP33",
            "ClientName": "Postman",
            "Description": "Postman API testing tool",
            "Enabled": true,
            "RequireConsent": true,
            "RedirectUris": ["https://www.getpostman.com/oauth2/callback", "https://oauth.pstmn.io/v1/callback", "https://oauth.pstmn.io/v1/browser-callback"],
            "ClientSecrets": [{"SecretType": "SharedSecret", "Secret": "re4&ih)+HQu~w"}],
            "AllowedGrantTypes": ["client_credentials", "authorization_code"],
            "AllowedSmartLegacyActions": [],
            "AllowedSmartActions": ["c", "r", "u", "d", "s"],
            "AllowedSmartSubjects": [ "patient", "user", "system"],
            "AlwaysIncludeUserClaimsInIdToken": true,
            "RequirePkce": false,
            "AllowOfflineAccess": false,
            "AllowOnlineAccess": false,
            "AllowFirelySpecialScopes": true,
            "RequireClientSecret": true,
            "RequireMfa": false,
            "AccessTokenType": "Jwt"
        }
    ]
}
The values for ClientId and ClientSecrets.Secret are randomly generated. You are recommended to generate your own values.
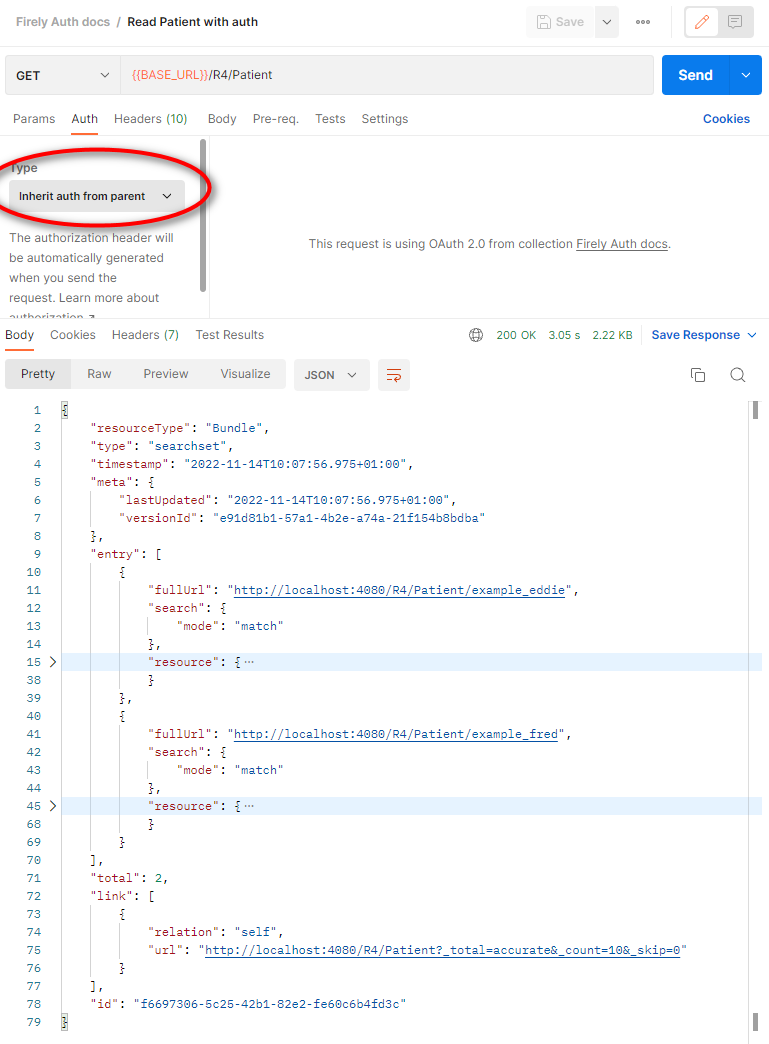
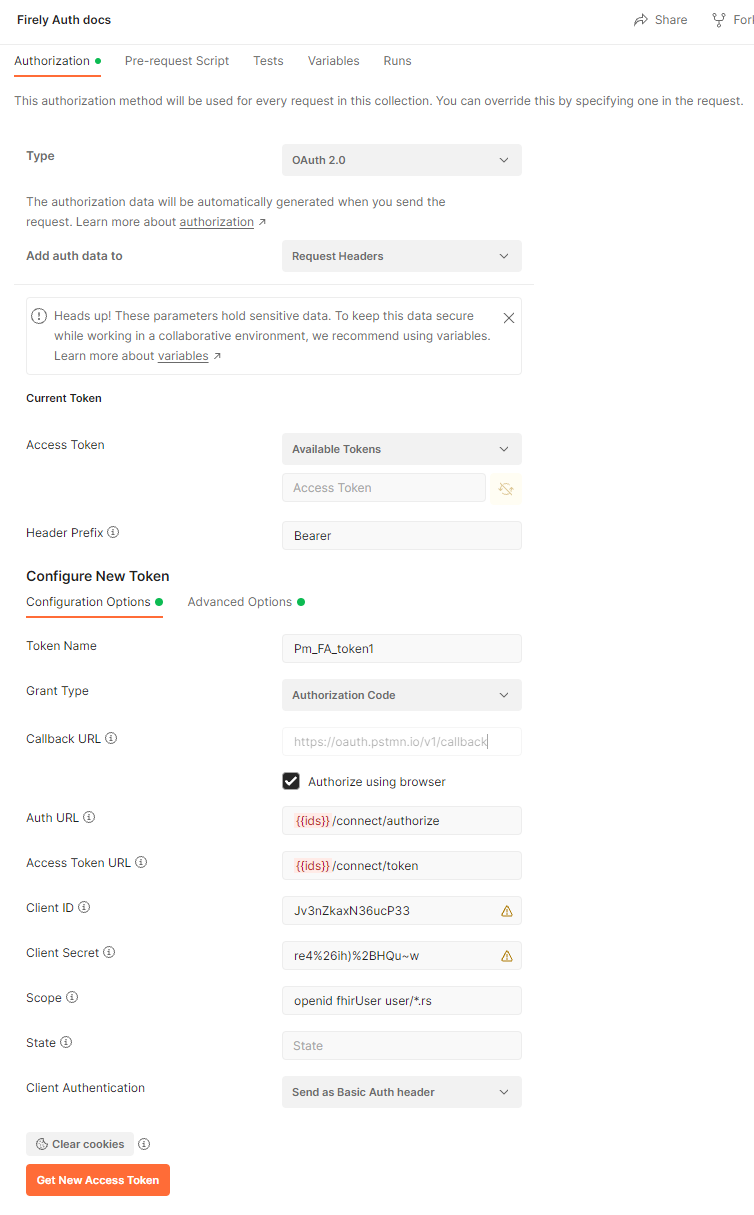
We will use Postman to issue a request for an Access Token. For this we created a collection ‘Firely Auth docs’, and we will set the Authorization for the collection as a whole. That way the authorization can be reused for all requests in the collection. Click ‘Get New Access Token’ and you’ll be taken to the login page of Firely Auth. You will have to create an user account to be able to log in first (see Step 6).
If the authorization request fails, check both the Postman console and the Firely Auth logging for a clue.
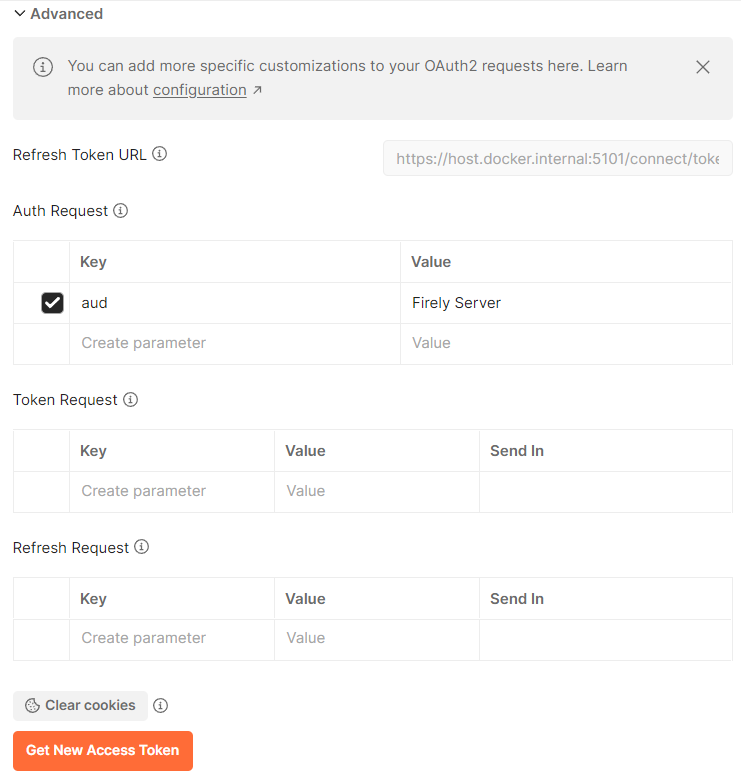
In the Authorization tab of the collection, set up the values according to the client settings above, see the image below.
Note that we also set the Audience in the Advanced Settings to the default value Firely Server. This corresponds to settings discussed below.
Note
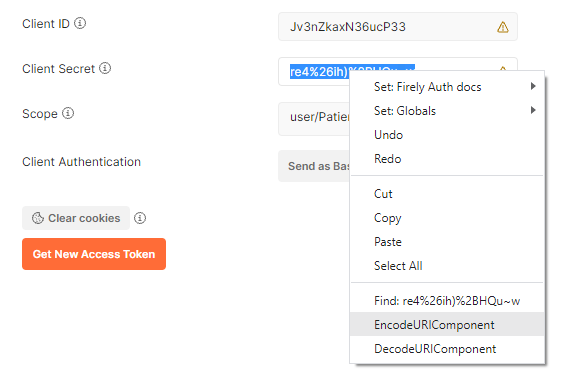
Encoding the secret
The client secret as set in the ClientRegistration contains characters that must be URI-encoded.
For secure secrets this may happen. In Postman, select the client secret string, right-click and choose “EncodeURIComponent”.
For other clients you may use any other URI encoding tool, or encode it in your code before sending the access token request.
Step 7 - Users
With the required settings in place, you can start Firely Auth in PowerShell by running:
> ./Firely.Auth.Core.exe
And you can access it with a browser on https://localhost:5001. It will use the self-signed certificate by default, for which your browser may warn you.
Accept the risk and proceed to the website.
Firely Auth will present you with a screen to create an admin account. Enter an e-mail address and password and you will be able to log into the management environment. Here you can manage users, view clients and view the openid configuration.
You need to add at least one non-admin user to be able to use Firely Auth, go to User Management and click the + to add a user.
An email will be sent to this user to activate the account and set a password. After this is done, you can now use this account to get an access token.
Step 8 - Connect Firely Server to Firely Auth
Ultimately the access token that we just retrieved is meant to get access to resources in Firely Server. To demonstrate that we will:
Set up Firely Server locally.
Adjust the settings to connect it to Firely Auth
Setting up Firely Server is described in Getting Started. Please follow that instruction if you have not already done so. For this introduction you can use the default settings and repositories for both data and administration, being SQLite. We will adjust only 1 setting to more easily work with FHIR R4:
"InformationModel": {
  "Default": "Fhir4.0", // information model to use when none is specified in either mapping, the _format parameter or the ACCEPT header
  "IncludeFhirVersion": ["Fhir4.0", "Fhir5.0"],
  "Mapping": {
    "Mode": "Path", // yourserver.org/r3 => FHIR STU3; yourserver.org/r4 => FHIR R4
    "Map": {
     "/R3": "Fhir3.0",
     "/R4": "Fhir4.0"
    }
},
With this, we can use <base>/R4 to use FHIR R4 (see for background Multiple versions of FHIR).
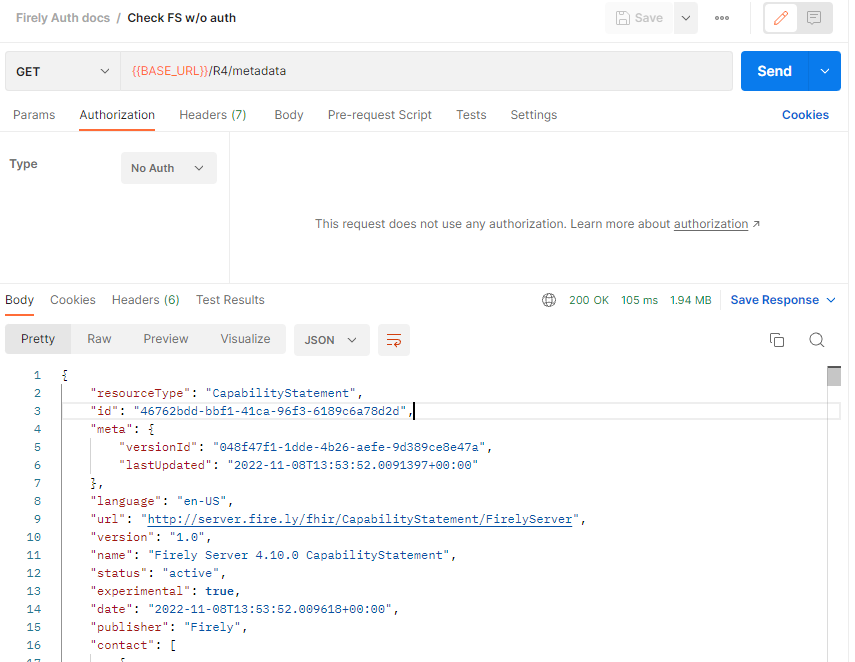
Check that it runs without authorization before proceeding with the next step, by requesting the CapabilityStatement:
To be able to test the next steps, add a few example resources by issuing a batch request (POST <base>/R4/)
with this bundle (while authorization is still off).
It contains two Patient resources and an Observation related to each of them.
Now we will connect Firely Server and Firely Auth. This requires mutual settings.
In Firely Auth, the following settings are used:
"FhirServer": {
    "Name": "Firely Server",
    "FHIR_BASE_URL": "http://localhost:4080",
    // "IntrospectionSecret": "<secret>"
},
The Name in this section serves two purposes:
it acts as the username for accessing the token introspection point.
it is used for translating FHIR_BASE_URL to the aud (Audience) claim in the access token supplied to the requesting app.
The FHIR_BASE_URL is the url on which Firely Server can be reached by the requesting app. It is used to turn the fhirUser claim (e.g. Patient/123) into a full url.
The `IntrospectionSecret is used to authenticate the introspection request. It is only used for clients with AccessTokenType set to Reference, but you will need to set this for now.
In Firely Server, all the settings are in the section SmartAuthorizationOptions
"SmartAuthorizationOptions": {
  "Enabled": true,
  "Filters": [
    {
      "FilterType": "Patient", //Filter on a Patient compartment if a 'patient' launch scope is in the auth token
      "FilterArgument": "_id=#patient#" //... for the Patient that has an id matching the value of that 'patient' launch scope
    }
  ],
  "Authority": "https://localhost:5001",
  "Audience": "http://localhost:4080", //Has to match the value the Authority provides in the audience claim.
  "RequireHttpsToProvider": true, //You want this set to true (the default) in a production environment!
  "Protected": {
    "InstanceLevelInteractions": "read, vread, update, patch, delete, history, conditional_delete, conditional_update, $validate, $meta, $meta-add, $meta-delete, $export, $everything, $erase",
    "TypeLevelInteractions": "create, search, history, conditional_create, compartment_type_search, $export, $lastn, $docref",
    "WholeSystemInteractions": "batch, transaction, history, search, compartment_system_search, $export, $exportstatus, $exportfilerequest"
  },
  // "TokenIntrospection": {
  //     "ClientId": "Firely Server",
  //     "ClientSecret": "secret"
  // },
  "ShowAuthorizationPII": false,
  //"AccessTokenScopeReplace": "-",
  "SmartCapabilities": [
    "LaunchStandalone",
    "LaunchEhr",
    //"AuthorizePost",
    "ClientPublic",
    "ClientConfidentialSymmetric",
    //"ClientConfidentialAsymmetric",
    "SsoOpenidConnect",
    "ContextStandalonePatient",
    "ContextStandaloneEncounter",
    "ContextEhrPatient",
    "ContextEhrEncounter",
    "PermissionPatient",
    "PermissionUser",
    "PermissionOffline",
    "PermissionOnline",
    "PermissionV1",
    //"PermissionV2",
    "ContextStyle",
    "ContextBanner"
  ]
},
Note
You need to have the Vonk.Plugin.Smart plugin enabled in your PipelineOptions.
All settings are discussed in detail in Firely Server, and we’ll focus on the connection with Firely Auth here:
Authority: the address where Firely Auth can be reached.
Audience: By default
http://localhost:4080, should match theFhirServer.FHIR_BASE_URLsetting in Firely Auth. In Postman, theaudshould match theFhirServer.Name.
Now we should be able to issue an authorized request to Firely Server with the token we requested on the collection in Step 4.