Firely Auth Introduction
Firely Auth is an authentication and authorization server that implements the SMART on FHIR authentication flows. It is an add-on to Firely Server.
Several implementation guides and scenarios require the use of SMART on FHIR:
Bulk Data Export
(g)(10) certification
Inferno testing
Firely Auth can be used to fulfill all of them.
There are various ways to get to know Firely Auth and the way it works together with Firely Server. As an introduction we’ll setup both to make an example Postman collection work. In the configuration section, we discuss the configuration that is possible both in Firely Auth itself and in Firely Server.
Getting started
Step 1 - Software
Firely Auth is distributed as .NET Core 6 binaries and in a Docker image. For this introduction we will use the binaries.
Install .NET Core 6 Runtime
#. You can request a copy of the binaries from Firely through our contact page .. #. Download the zip file with Firely Auth binaries from the download server #. Extract the zip to a location from where you are allowed to execute the program. We will call this the ‘bin-directory’
Step 2 - License
Firely Auth is licensed, like all plugins and add-ons of Firely Server. It uses the same license file as the Firely Server instance it works with.
Firely Auth requires this token to be present in the license file: http://fire.ly/server/auth.
If you don’t have this in your license file yet, you probably need to acquire Firely Auth first. Please Contact us for that.
By default Firely Auth will look for a license file named firely-server-license.json, adjacent to the Firely.IdentityServer.Core.exe
You can adjust the location of the license file in the configuration settings, see License.
Additionally you will have to place a file called Duende_License.key also adjacent to the Firely.IdentityServer.Core.exe. Please note that the path to this file cannot be configured.
With the license in place, you can start Firely Auth by running:
> ./Firely.IdentityServer.Core.exe
And you can access it with a browser on https://localhost:5001. It will use a self-signed certificate by default, for which your browser will warn you.
Accept the risk and proceed to the website.
Firely Auth will present you with a login screen. But what user to login as?
Step 3 - Users
You need to add at least one user to Firely Auth. Firely Auth supports two types of stores for users: In memory and SQL Server. For this introduction we will configure a user in the In memory store.
Go to the bin-directory
Open appsettings.default.json
Look for the section
UserStoreBy default the
Typeis already set toInMemory.Now add to the
InMemory:AllowedUsersarray:
{
    "Username": "alice",
    "Password": "AlicePassword1!",
    "AdditionalClaims": []
}
We won’t add any claims yet - see User store to read up on how they work.
If you did this, you can stop Firely Auth again in the command window you started it in (Ctrl+C), and start it again.
You should now be able to login as alice with the password as configured above.
This time, Firely Auth will tell you that there are no clients configured that can access data on your behalf.
Step 4 - Clients
The concept of OAuth2 in general and SMART on FHIR in particular is that a client (an app, a website) can access data on your behalf. This means that Firely Auth must know these clients upfront. For each client several values need to be configured. For this introduction we will add Postman as a client, so you can test requests without actually building a client yourself. We’ll just provide the correct settings here. The settings are documented in detail on Clients
Note
Making Postman trust the self-signed certificate of Firely Auth is outside the scope of this tutorial. For the purpose of this tutorial you can instruct Postman to not check SSL certificates.
"ClientRegistrationConfig": {
    "AllowedClients": [
        {
            "ClientId": "Jv3nZkaxN36ucP33",
            "ClientName": "Postman",
            "Description": "Postman API testing tool",
            "Enabled": true,
            "RequireConsent": true,
            "RedirectUris": ["https://www.getpostman.com/oauth2/callback", "https://oauth.pstmn.io/v1/callback"],
            "ClientSecrets": [{"SecretType": "SharedSecret", "Secret": "re4&ih)+HQu~w"}],
            "AllowedGrantTypes": ["client_credentials", "authorization_code"],
            "AllowedSmartLegacyActions": [],
            "AllowedSmartActions": ["c", "r", "u", "d", "s"],
            "AllowedSmartSubjects": [ "patient", "user", "system"],
            "AlwaysIncludeUserClaimsInIdToken": true,
            "RequirePkce": false,
            "AllowOfflineAccess": false,
            "AllowOnlineAccess": false,
            "AllowFirelySpecialScopes": true,
            "RequireClientSecret": true,
            "LaunchIds": [],
            "RequireMfa": false
        }
    ]
}
The values for ClientId and ClientSecrets.Secret are randomly generated. You are recommended to generate your own values.
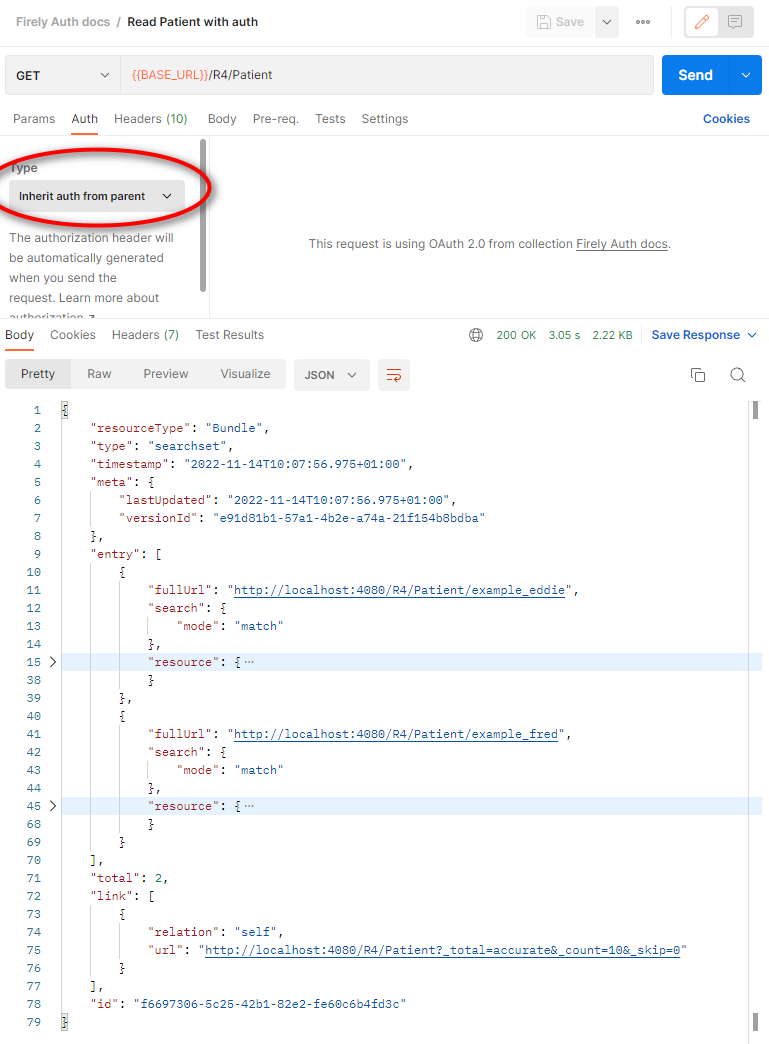
We will use Postman to issue a request for an Access Token. For this we created a collection ‘Firely Auth docs’, and we will set the Authorization for the collection as a whole. That way the authorization can be reused for all requests in the collection. Click ‘Get New Access Token’ and you’ll be taken to the login page of Firely Auth. If you are still logged in since step 3, you will be authorized immediately.
If the authorization request fails, check both the Postman console and the Firely Auth logging for a clue.
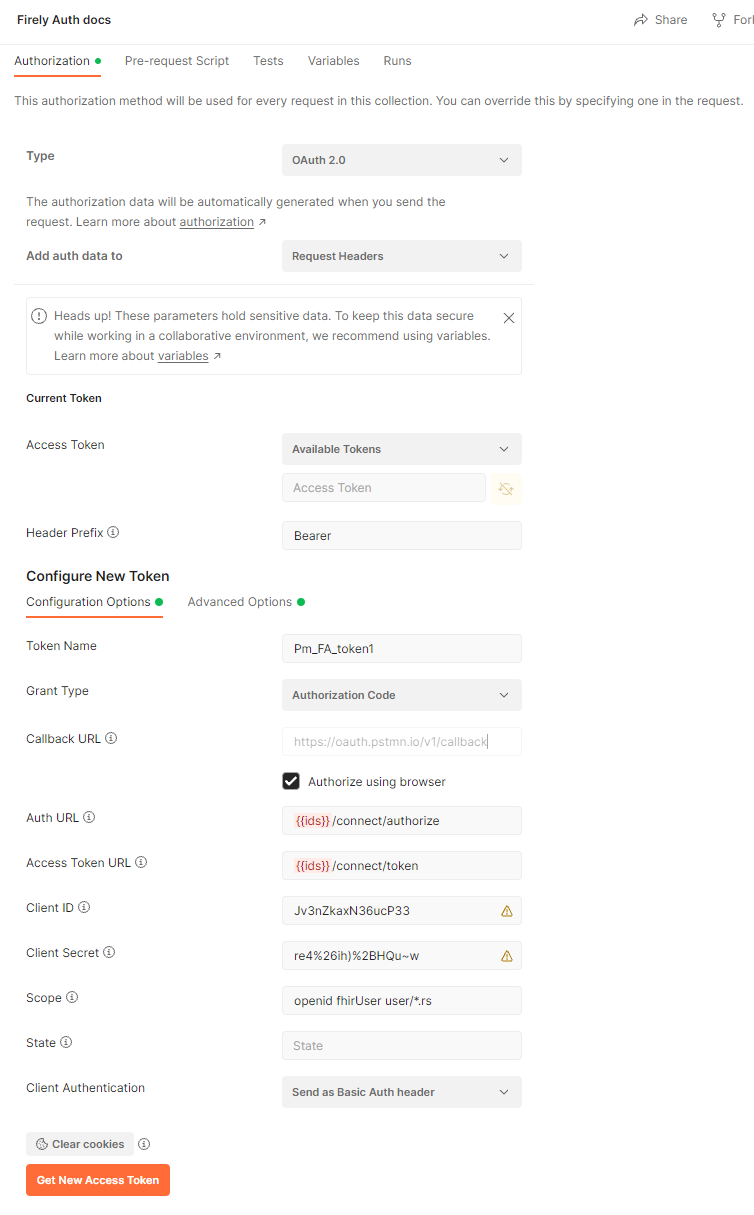
In the Authorization tab of the collection, set up the values according to the client settings above, see the image below.
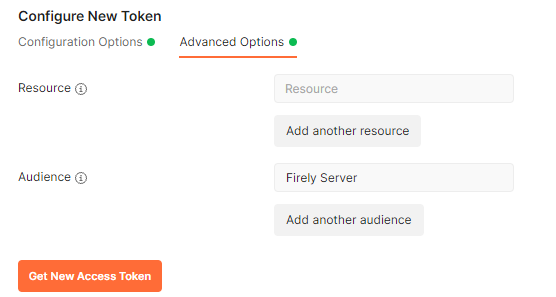
Note that we also set the Audience in the Advanced Settings to the default value Firely Server. This corresponds to settings discussed below.
Note
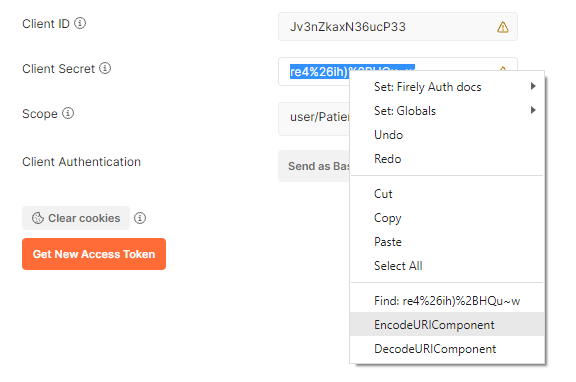
Encoding the secret
The client secret as set in the ClientRegistrationConfig contains characters that must be URI-encoded.
For secure secrets this may happen. In Postman, select the client secret string, right-click and choose “EncodeURIComponent”.
For other clients you may use any other URI encoding tool, or encode it in your code before sending the access token request.
Step 5 - Connect Firely Server to Firely Auth
Ultimately the access token that we just retrieved is meant to get access to resources in Firely Server. To demonstrate that we will:
Set up Firely Server locally.
Adjust the settings to connect it to Firely Auth
Setting up Firely Server is described in Getting Started. Please follow that instruction if you have not already done so. For this introduction you can use the default settings and repositories for both data and administration, being SQLite. We will adjust only 1 setting to more easily work with FHIR R4:
"InformationModel": {
  "Default": "Fhir4.0", // information model to use when none is specified in either mapping, the _format parameter or the ACCEPT header
  "IncludeFhirVersion": ["Fhir4.0", "Fhir5.0"],
  "Mapping": {
    "Mode": "Path", // yourserver.org/r3 => FHIR STU3; yourserver.org/r4 => FHIR R4
    "Map": {
     "/R3": "Fhir3.0",
     "/R4": "Fhir4.0"
    }
},
With this, we can use <base>/R4 to use FHIR R4 (see for background Multiple versions of FHIR).
Check that it runs without authorization before proceeding with the next step, by requesting the CapabilityStatement:
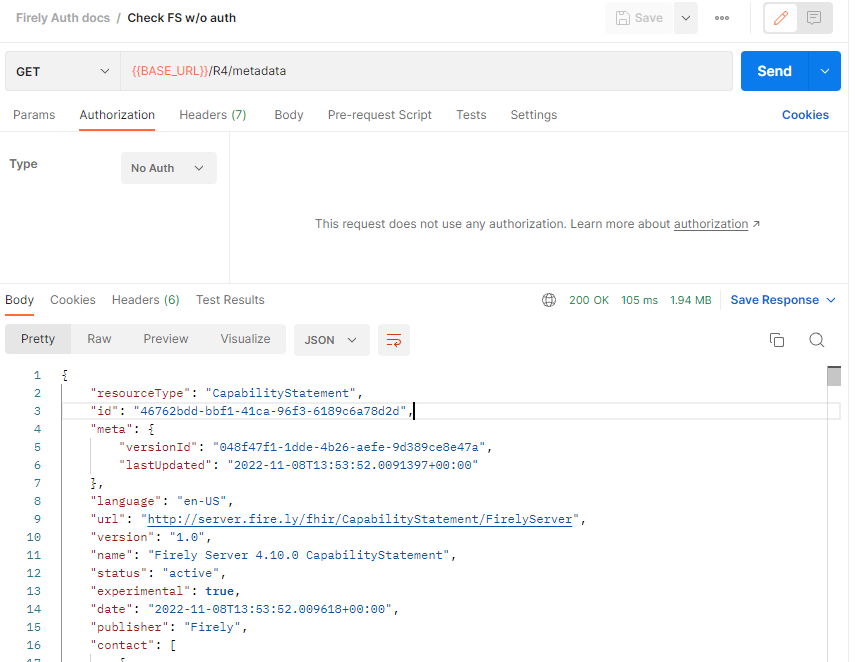
To be able to test the next steps, add a few example resources by issuing a batch request (POST <base>/R4/)
with this bundle (while authorization is still off).
It contains two Patient resources and an Observation related to each of them.
Now we will connect Firely Server and Firely Auth. This requires mutual settings.
In Firely Auth:
"FhirServerConfig": {
    "Name": "Firely Server",
    "FHIR_BASE_URL": "http://localhost:4080"
},
The Name in this section serves two purposes:
it acts as the username for accessing the token introspection point.
it is used for the aud (Audience) claim in the access token supplied to the requesting app.
The FHIR_BASE_URL is the url on which Firely Server can be reached by the requesting app. It is used to turn the fhirUser claim (e.g. Patient/123) into a full url.
In Firely Server, all the settings are in the section SmartAuthorizationOptions
"SmartAuthorizationOptions": {
  "Enabled": true,
  "Filters": [
    {
      "FilterType": "Patient", //Filter on a Patient compartment if a 'patient' launch scope is in the auth token
      "FilterArgument": "_id=#patient#" //... for the Patient that has an id matching the value of that 'patient' launch scope
    }
  ],
  "Authority": "https://localhost:5001",
  "Audience": "Firely Server", //Has to match the value the Authority provides in the audience claim.
  "RequireHttpsToProvider": true, //You want this set to true (the default) in a production environment!
  "Protected": {
    "InstanceLevelInteractions": "read, vread, update, patch, delete, history, conditional_delete, conditional_update, $validate, $meta, $meta-add, $meta-delete, $export, $everything, $erase",
    "TypeLevelInteractions": "create, search, history, conditional_create, compartment_type_search, $export, $lastn, $docref",
    "WholeSystemInteractions": "batch, transaction, history, search, compartment_system_search, $export, $exportstatus, $exportfilerequest"
  },
  // "TokenIntrospection": {
  //     "ClientId": "vonk",
  //     "ClientSecret": "secret"
  // },
  "ShowAuthorizationPII": false,
  //"AccessTokenScopeReplace": "-",
  "SmartCapabilities": [
    "LaunchStandalone",
    "LaunchEhr",
    //"AuthorizePost",
    "ClientPublic",
    "ClientConfidentialSymmetric",
    //"ClientConfidentialAsymmetric",
    "SsoOpenidConnect",
    "ContextStandalonePatient",
    "ContextStandaloneEncounter",
    "ContextEhrPatient",
    "ContextEhrEncounter",
    "PermissionPatient",
    "PermissionUser",
    "PermissionOffline",
    "PermissionOnline",
    "PermissionV1",
    //"PermissionV2",
    "ContextStyle",
    "ContextBanner"
  ]
},
Note
For the scope that is setup in postman to work, you need to have the Vonk.Plugin.SoFv2 plugin enabled and the Vonk.Smart plugin disabled in your PipelineOptions
If you cannot change this, then adjust the scope in the authorization configuration in postman to: openid fhirUser user/*.read
All settings are discussed in detail in Firely Server, and we’ll focus on the connection with Firely Auth here:
Authority: the address where Firely Auth can be reached.
Audience: By default
Firely Server, should match theFhirServerConfig.Namesetting in Firely Auth and the requestedaudin Postman.
Now we should be able to issue an authorized request to Firely Server with the token we requested on the collection in Step 4.